

Introduction #
While working on a sample application for Amazon Bedrock AgentCore using the Spring AI framework, I discovered the AgentCore CLI. Building the complete infrastructure for a Java-based AgentCore application with AWS CDK requires quite a bit of setup, and I was mainly interested in experimenting with Evaluations through AgentCore Observability.
While searching for examples and documentation, I came across the AWS guide on getting started with the AgentCore CLI. Since the CLI currently focuses on Python, I had to set Java aside for a moment and switch back to Python with Strands.
After spending some time with the CLI, I was pleasantly surprised. The AgentCore CLI is more than a simple wrapper around CDK. It streamlines the deployment process and provides an excellent user interface for interacting with your agent, both locally and after deployment to AWS.
In this post, I’ll walk through the complete process: creating an agent, testing it locally, deploying it to AWS, and validating the deployed version. Along the way, you’ll learn how to add Memory. In the next blog post, I will discuss adding Observability and Evaluations to your AgentCore applications.
Working with the CLI #
You have to install the CLI through NPM as it is a Node project. You can find detailed instructions in the documentation for the CLI:
Amazon Bedrock AgentCore CLI documentation
First install of the CLI #
Below is an example CLI invocation. Hugo renders fenced code blocks with syntax highlighting.
npm install -g @aws/agentcore
agentcore --help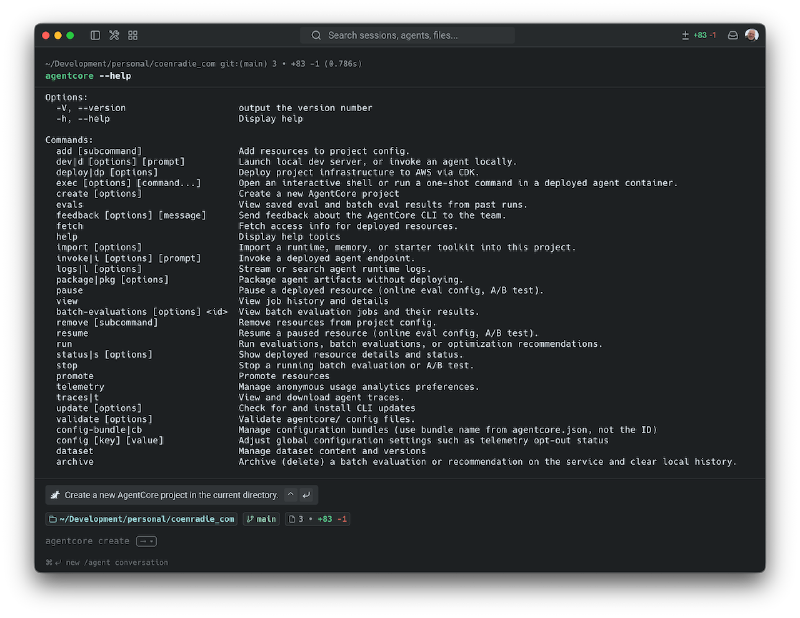
Before you start, you need an AWS account. I prefer to log in with SSO. As an AWS community builder, I receive free credits for a year and therefore also have a personal account. I need to tell SSO to use that account.
aws sso login --profile personalMost commands require access to this profile to work; I export its value to an environment variable.
export AWS_PROFILE=personalCreate the application #
The CLI includes an interactive version, but I like to have a good overview of the configuration for the new project. Note that this command does not allocate memory; you can do that later. I like to use the Bedrock wrapper to load models so you can easily change the model the agent is using.
agentcore create
    --name CLIAgentExample
    --framework Strands
    --protocol HTTP
    --model-provider Bedrock
    --memory none
Below is the complete tree of the generated output. The tree contains the app and the CDK code in the agentcore directory.
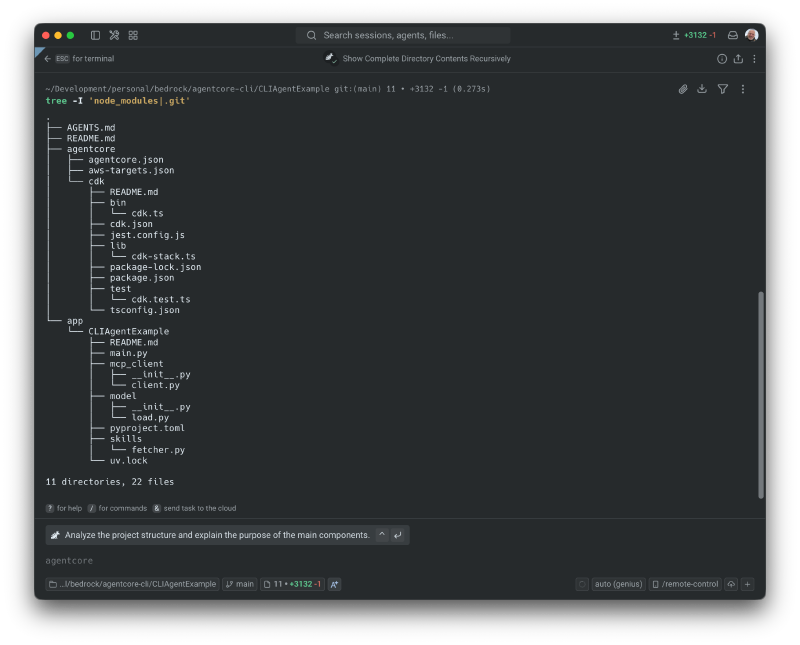
Inspect the generated program #
The app consists of a few files:
- main.py: The agent initialisation
- mcp_client/client.py: Configuration of an MCP client, the default provides access to a web search API.
- model/load.py: configures the model that the agents use. I changed this to Nova Lite.
- skills/fetcher.py: provides a skills loader, which at the moment is not in use.
You can change the model the agent uses by editing the file model/load.py. I am using the Nova Lite model. The next code block shows the new file content.
from strands.models.bedrock import BedrockModel


def load_model() -> BedrockModel:
    """Get Bedrock model client using IAM credentials."""
    return BedrockModel(model_id="eu.amazon.nova-2-lite-v1:0")
You can change the system prompt in the main.py file. For now, I leave it as it is.
Run and explore the Developer User Interface #
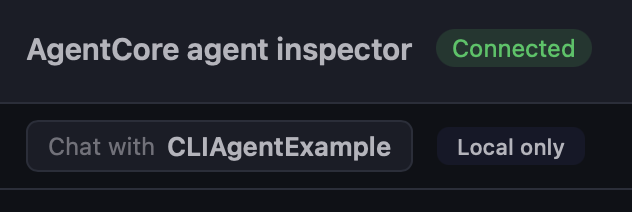
I was positively surprised when I first started the developer console, or the AgentCore agent inspector. It enables you to test your agent before deploying. Beware, it does use the online models, you need access to your account through IAM. You start the GUI through the following command.
remember to export your profile when not using the default AWS profile
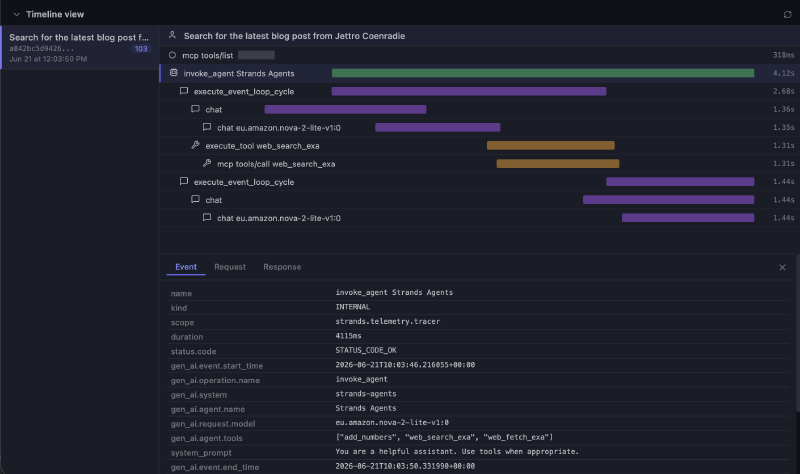
agentcore devBelow is the screenshot. I asked the agent to search for the latest blog post from Jettro Coenradie. There is a lot of information on the screen. Therefore, I extract small parts to talk about them.

Conversation box #
The conversation box displays your conversation with the agent. In the top left, you see the agent’s name, the connection status, and, for now, that we’re talking to the local version. At a later stage, you can also select the deployed version here.
In the top-right corner of this section, you see the session ID and a delete icon. The session is used to keep track of the current conversation. You can start a new session by deleting the current session with a click on the delete icon.

Next is the actual interaction; I leave that for now. You can explore this in the original screenshot. The final part of the conversation box is the number of input and output tokens, along with the tools used. I opened the toggle so you can see what the interaction with the web search tool was like.

Timeline view #
Each call to the agent collects statistical information on the request. You can see the calls the agent made, how long they took, and drill down into the request and response. The traces in the next section include all the spans exposed by the application, but this view gives you a good idea of the timings of the different parts of your agent’s execution.
One thing I notice with the input/output stats is that they only show the initial invoke. It does not include the tokens used by the tools, as you can see in the next section.
Resources view #
In this view, you get an overview of the resources in use. I will revisit this panel after deployment. For now, focus on the traces tab. This provides detailed information on all observable spans of the application. This is where Strands shines; everything is configured out of the box. For the call I did, there are 103 spans. The screenshot filters on the agentic spans. Notice the in/out for the tool call. That shows you we handle more tokens than the conversation suggests.
After the deployment, you can also select CloudWatch logs instead of the local traces.

Add memory to the agent #
I wrote blogs on using short- and long-term memory with Amazon Bedrock AgentCore before. I will not repeat everything. We do not have to add short-term memory; this is exactly what the sessions we discussed before are about. Keeping the conversation history. In this context, adding memory is all about long-term memory. You can add the following different types.
- Semantic: stores facts, definitions and rules
- Summarization: stores key insights
- User preference: stores personal choices and preferences
- Episodic: stores actions and decisions to improve agent performance.
You can learn about all the available options through AgentCore help.
agentcore add memory --helpI used the defaults for new memory, except for the name and the strategies.
agentcore add memory
    --name CLIAgentExampleMemory
    --strategies SEMANTIC,SUMMARIZATION,USER_PREFERENCE,EPISODIC
Before we can start using memory, we need to deploy it. There is no local alternative. Therefore, this is the right moment to deploy everything; this is discussed in the next section.
The problem with adding memory later #
I choose to add memory to the agent later. To be honest, this made things a bit harder. It does configure the memory within AgentCore; however, it does not add it to your agent. Now you have to do manually what would have happened if you added memory immediately. Below is the alternative command that adds memory.
agentcore create
    --name CLIAgentWithMemory
    --framework Strands
    --protocol HTTP
    --model-provider Bedrock
    --memory longAndShortTerm
This getting started page tells you what to do when adding memory.
For the example, you have to do a few things. First, you have to add the following session.py to a new memory package.
import os
import uuid
from typing import Optional

from bedrock_agentcore.memory.integrations.strands.config import AgentCoreMemoryConfig, RetrievalConfig
from bedrock_agentcore.memory.integrations.strands.session_manager import AgentCoreMemorySessionManager

MEMORY_ID = os.getenv("MEMORY_CLIAGENTEXAMPLEMEMORY_ID")
REGION = os.getenv("AWS_REGION")

def get_memory_session_manager(session_id: Optional[str], actor_id: str) -> Optional[AgentCoreMemorySessionManager]:
    if not MEMORY_ID:
        return None

    # AgentCoreMemoryConfig rejects None; OAuth/CUSTOM_JWT callers can reach us
    # without a runtime session header, so synthesize one when absent.
    session_id = session_id or uuid.uuid4().hex

    retrieval_config = {
        f"/users/{actor_id}/facts": RetrievalConfig(top_k=3, relevance_score=0.5),
        f"/users/{actor_id}/preferences": RetrievalConfig(top_k=3, relevance_score=0.5),
        f"/episodes/{actor_id}/{session_id}": RetrievalConfig(top_k=5, relevance_score=0.5),
        f"/summaries/{actor_id}/{session_id}": RetrievalConfig(top_k=3, relevance_score=0.5),
    }

    return AgentCoreMemorySessionManager(
        AgentCoreMemoryConfig(
            memory_id=MEMORY_ID,
            session_id=session_id,
            actor_id=actor_id,
            retrieval_config=retrieval_config,
        ),
        REGION
    )
It is essential that you replace the environment key that results in MEMORY_ID. This should equal the name of the memory you have created.
I copied the code for this by creating a new AgentCore application, but with a different name. I missed this, and it took me an hour or so to figure it out.
Second, you have to replace the method in main.py called get_or_create_agent with the following implementation. Notice that we use user_id to generate actor_id.
def agent_factory():
    cache = {}
    def get_or_create_agent(session_id, user_id):
        _actor_id = user_id
        key = f"{session_id}/{_actor_id}"
        if key not in cache:
            cache[key] = Agent(
                model=load_model(),
                session_manager=get_memory_session_manager(session_id, _actor_id),
                conversation_manager=_make_conversation_manager(),
                system_prompt=DEFAULT_SYSTEM_PROMPT,
                tools=tools,
                hooks=[
                ],
            )
        return cache[key]
    return get_or_create_agent
get_or_create_agent = agent_factory()
Third, change the call to get_or_create_agent, replace it with the following three lines.
session_id = getattr(context, 'session_id', 'default-session')
user_id = getattr(context, 'user_id', 'default-user')
agent = get_or_create_agent(session_id, user_id)
Now you are ready to deploy.
Deploy to the cloud #
The command to deploy is very simple, but a lot happens from this point on. The CDK project is created, diffs are calculated, and the CloudFormation changes are deployed. Beware, this does incur costs and can take some time.
agentcore deploy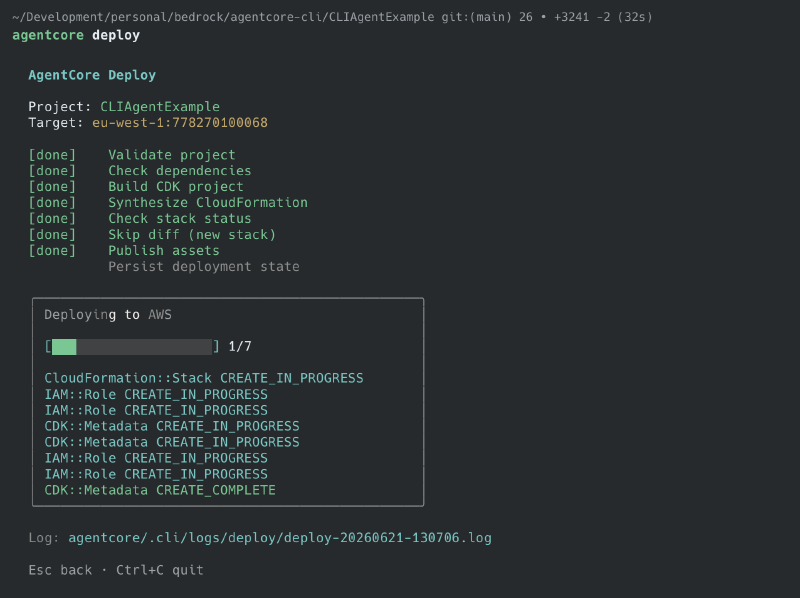
Next, you can restart the developer console or the AgentCore agent inspector. Notice in the resources tab that the agent and the memory are now deployed.
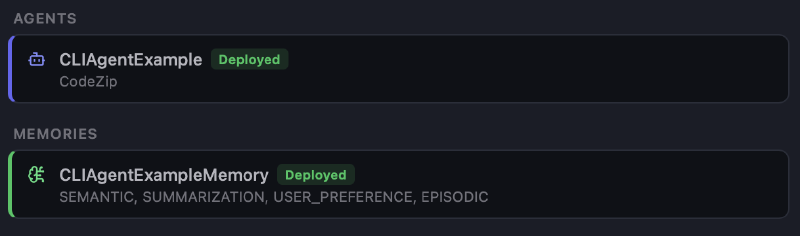
By default, you still connect to the local agent, but in the top-left corner, you can now select the deployed version. I want the agent to remember me, therefore I told him to remember my name. Later, I want to see whether long-term memory is working and whether it stores my name.
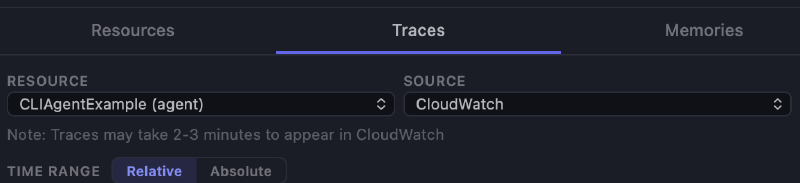
Next, you can switch to the traces tab. Notice that you can now change the source. Select CloudWatch and check the available spans.
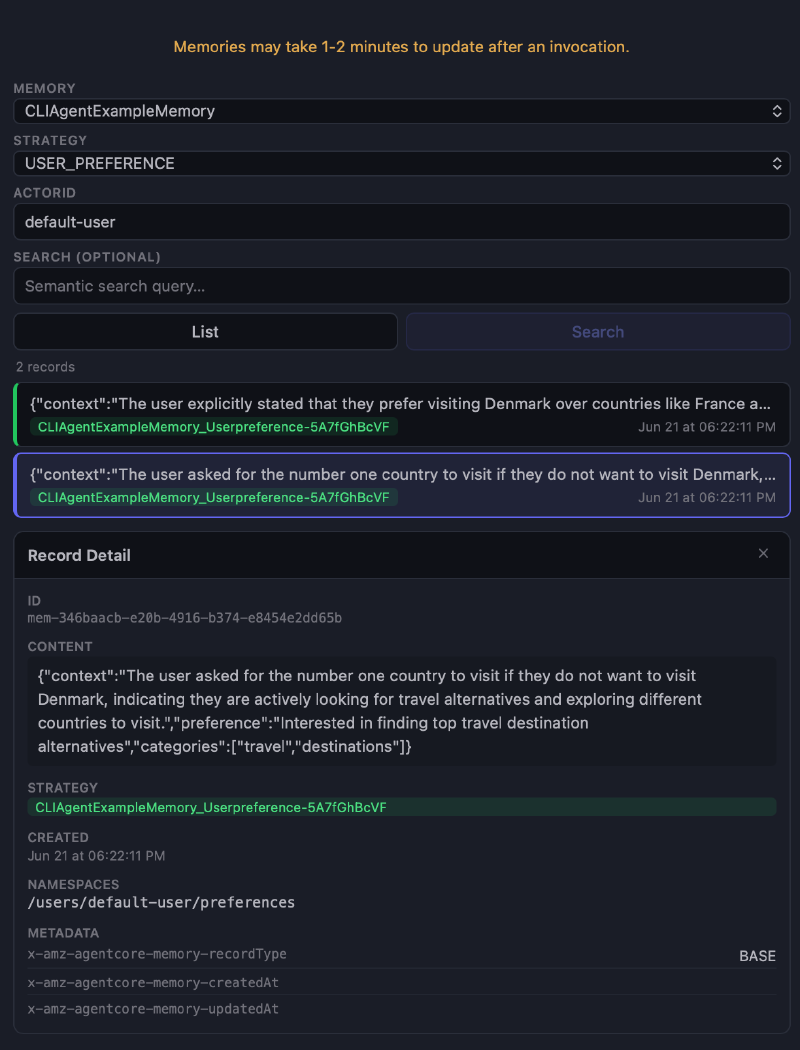
Check the long-term memory #
With everything in place, you should also be able to find memory items. Input something like your preferred holiday country and ask for an alternative. The next screen shows the items in the user preference memory.
Concluding #
This is it. I hope you learned something from this. Of course, you can use agentcore CLI to destroy everything after your experiments.
Removing is a two-step process, first you remove all resources from your project, then you deploy to remove everything.
agentcore remove all
agentcore destroy